Spiderman Cookies

Spiderman is my favorite superhero. Yes, I still love Ironman, Superman, Batman, Thor, Hulk, etc. etc. but I adore Spiderman, and yes, Andrew Garfield is hot, but that’s not the only reason…
I absolutely loved the Amazing Spiderman, and I prefer Gwen Stacey to Mary-Jane (I love Emma Stone as Gwen 🙂 In May of next year (2014), part 2 of the Amazing Spiderman will come out (and sadly I think that’s the one in which Gwen Stacey dies, however, it could be the third one in the series). And though these cookies would have been perfect for a video around then, I couldn’t wait. I am particularly proud of these cookies because they are so simple yet so attractive, I’m sure any superhero fan would love to have a batch of these Spiderman cookies. So from one superhero fan to another, here’s a recipe for spiderman cookies.
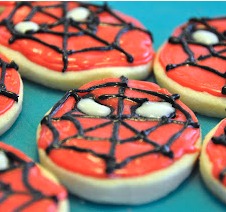
Something I forgot to include in the video was the consistency of the icing. I added a little extra confectioners’ sugar to the black icing to make it thicker so I could pipe the black lines on the face without everything mixing together. Also, it is very important to make sure that the ring around the face and the black for the eyes dry before filling the rings with red so that the black does not mix with the red.
Make sure you use the smallest tip you can find for the black, however, try to make the eye lines thicker. If you don’t have a piping bag, try out a ziplock bag and snip the end, although, I am not promising great results- the piping bags enable the icing to flow out smoothly, and make straight, consistent lines. If I had to do the video over, I would have made the circles a bit neater, and the eyes a bit wider. Other than that, I think this Spiderman cookie recipe is perfect, and not too difficult to try!
Alternatively, you could give my Spiderman cupcakes recipe a go!
Spiderman Cookies
Ingredients
- 10 Oval shaped cookies
- 1 cup Frosting for every 10 cookies, either royal icing or my sugar cookie frosting
- 3 piping bags, one can be rolled up parchment paper to form a cone- make sure its properly sealed… see the video!
- 1 small tip, 3 or below
- 1 larger tip, 5 or below
- black food coloring
- red food coloring
Instructions
- Draw eyes on the cookies either using an edible marker or food coloring and a toothpick (you can make engravings on the cookies if you use my recipe, as they are so soft).
- Divide the icing into three portions, a small portion for the eyes, a slightly larger portion for the face and outline.
- Dye the larger portions black and red.
- Snip the ends of 2 piping bags and insert the tips.
- Add the black icing in the bag with a smaller tip, and the red icing in the one with a larger tip.
- Pipe the eyes- these are two diagonal semi circles.
- Pipe an oval around the cookie.
- Wait till this hardens, then fill the cookie with red. Try not to get any on the black borders for the eyes.
- Then take the black icing again, and pipe a line vertically across the middle of the face. Pipe a line horizontally just below the ices. Pipe a line on both diagonals. Then make two webs that connect lines (see video!)
- Fill the eyes with the white icing using a parchment cone or piping bag- you could also use a spoon if you are really neat.
- Please watch the video so you can get a better idea of what to do.

Pingback: Soft Frosted Sugar Cookies - Hot Chocolate Hits